It may sound like a forced companionship but it actually is a perfect harmony if you want to develop games with Phaser3 for mobile and any desktop environments. Of course you can still use Phaser without Ionic, React or TypeScript but there is too much to gain from the combination.
So what do we gain from each?
Components
TypeScript
TypeScript provides static type checking. But it also provides code completion in most modern text editors like Vscode, Atom etc. These editors are clever enough to provide code completion even without TypeScript. But this only happens inside the closure or class (depending on your context). Outside the closure, due to JavaScript's dynamic behaviour, editors will not know about the types. So, especially if you're starting to learn a framework (Phaser3 in our case) you do need code completion anywhere in your code. With code completion you will not even need to check documentation every time you type something. Take a look at below example:
import road from './road.png'
class MainScene extends Phaser.Scene {
constructor(){
this.myRoad = new Road(this)
}
preload(){
// You can get code completion here without TypeScript
this.load.image('road', road)
}
}
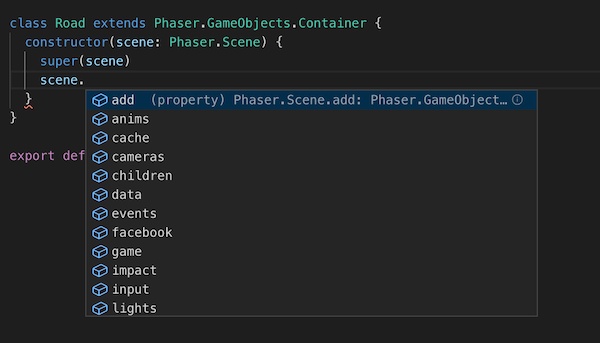
class Road extends Phaser.GameObjects.Container {
constructor(scene){
// !!!You won't get any code completion here!!!
scene.add.image(0, 0, 'road')
}
}
Above example, without TypeScript you can still gain from code completion inside the MainScene class. Because, inside the class code editor already knows that "this" refers to "Phaser.Scene" and it will fetch the metadata from this class and will provide you code completion even if you don't use TypeScript. But inside the Road class constructor, editor will not know what the type of the "scene" is, so it won't provide you any code completion. Because it can be anything. Number, string, boolean or a json object. If we used TypeScript, we would be using the Container class as below
class Road extends Phaser.GameObjects.Container {

    constructor(scene: Phaser.Scene){
        // We get code completion
        scene.add.image(0, 0, 'road')
    }
}
I have to admit. For me I love TypeScript because of its code completion rather than static type checking. It's super useful when I'm using learning a new framework. I don't need to go to documentation as it's already provided to me whenever I type a "dot".
React
React may not be indispensable for a Phaser3 project. But it may make things easier if you want to use your existing React skills and you don't want to prepare complex GUI for your game. With React you can create place holders for your Phaser.Game to mount. You can create the "About" and "Settings" page inside the React app. Otherwise these pages will need to be a Phaser.Scene which will take a good amount of development time. Of course a game app looks more professional if the all scenes are created within the framework. But even if you later on choose this path, React will give no harm giving a host to your Phaser.Game object other than few more kilobytes to add on top of your bundle. But for me, having a Phaser3 game embedded inside a React gives nice flexibility to scale the app.
Webpack
A Phaser game is HTML5 but you cannot simply double click index.html file and expect it to work inside the browser. It will need resources such as images, sounds, videos and many different file types. Accessing these files from your file system requires OS level permissions and your browser will throw errors. So you need to run your app from a local server. Webpack will bundle your files and then serve them locally, handle dynamic reloading as you change your code while developing, map the exact code you type to the one that runs inside the browser so you can debug, minify the code and many more. You will not need webpack dev server to run your production ready code. It's only to get to production ready code. When you get that code it's still a static web page and you can host it using Amazon S3, Nginx or any other server. To run it with Android and iOS or on Windows, Linux or macOS; we will use the help of Ionic Capacitor.
Ionic Capacitor
Capacitor is a great new tool from Ionic team that can turn any web app into a cross platform app. It's similar to Cordova but Capacitor makes the process extremely easy and any web app could be turned to an apk, ipa, exe, dmg etc. Capacitor does not dictate you a structure as long as you have a valid package.json file and and output folder that has a starting point. It creates the native bridge for each environment. All you need to do is to focus on your development.
As opposed to React Native, Ionic Capacitor does not provide you sophisticated debugging tools other than "console.log" but you don't need extreme debugging in native environments. You can debug your app using the browser and expect it to work exactly the same in the native environments. But for rare cases you can use "console.log" and check native environment logs (eg. Logcat for Android) for problem solving.
Application
So now let's combine all components to create a boilerplate that we can use for our Phaser3 applications from now on.
Below repository will be the similar to what we create in this tutorial. However, I may be optimising this repo over time. So, the code may not match exactly but it'll be quite similar.
https://github.com/aliustaoglu/boilerplates/tree/master/phaser3-capacitor-react-typescript-starter
Let's init our node app:
mkdir phaser3-starter
cd phaser3-starter
npm init
Now let's add below libraries using yarn
yarn add -D webpack webpack-cli webpack-dev-server
yarn add -D typescript ts-loader source-map-loader
yarn add -D style-loader css-loader file-loader
yarn add -D @types/react-dom @types/react
Create a new folder /src and add an empty index.tsx file in it.
Create webpack.config.js in root folder and add below content:
module.exports = {
  mode: process.env.NODE_ENV === "production" ? "production" : "development",
  devtool: "inline-source-map",
  entry: "./src/index.tsx",
  output: {
    path: __dirname + "/build",
    filename: "bundle.js",
  },
  devServer: {
    inline: true,
    contentBase: "./build",
    port: 3000,
  },
  resolve: {
    extensions: [".ts", ".tsx", ".js"],
  },
  module: {
    rules: [
      { test: /\.tsx?$/, exclude: /node_modules/, loader: "ts-loader" },
      { test: /\.js$/, use: ["source-map-loader"], enforce: "pre" },
      { test: /\.css$/, use: ["style-loader", "css-loader"] },
    ],
  },
  plugins: [],
};
Create a "tsconfig.json" file inside root folder and below content:
{
  "compilerOptions": {
    "outDir": "./www/",
    "sourceMap": true,
    "noImplicitAny": true,
    "module": "commonjs",
    "target": "es5",
    "jsx": "react",
    "resolveJsonModule": true,
    "skipLibCheck" : true,
    "esModuleInterop": true
  },
  "include" : [
      "./src/**/*"
  ],
  "exclude" : [
      "./test/**/*"
  ]
}
Change package.json file so it's like below:
{
  "scripts": {
    "test": "echo \"Error: no test specified\" && exit 1",
    "start": "webpack-dev-server --open",
    "devbuild": "webpack --mode development",
    "build": "webpack --mode production"
  }
}
Now if you run "npm start" your terminal should compile everything successfully and open a blank page in your browser. It will say "Cannot GET /" but that's because we have no content.
Let's create a new folder called "www" and index.html inside it with below content:
<!DOCTYPE html>
<html lang="en">
<head>
    <meta charset="UTF-8">
    <meta name="viewport" content="width=device-width, initial-scale=1.0">
    <meta http-equiv="X-UA-Compatible" content="ie=edge">
    <title></title>
</head>
<body>
    <div id="root"></div>
    <script type="text/javascript" src="bundle.js"></script>
</html>
Now "npm start" should still have no errors in console and open an empty page with no errors. Now TypeScript and Webpack running smoothly let's add React.
yarn add react react-dom
Enter below content to "src/index.tsx"
import React from 'react'
import ReactDOM from 'react-dom'
import App from './components/App'

ReactDOM.render(<App />, document.getElementById('root'))
Create a new folder called "components" inside and add App.tsx file so it's location "src/components/App.tsx"
import React from 'react'

type AppProps = {}
type AppState = {}

class App extends React.Component<AppProps, AppState> {
  constructor(props: AppProps) {
    super(props)
  }

  render() {
    return <>Hello from React</>
  }
}

export default App
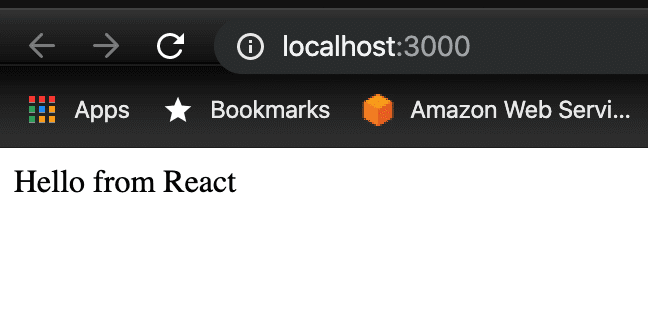
npm start
And see React hello world app is running:
Now let's Phaser libraries:
yarn add phaser
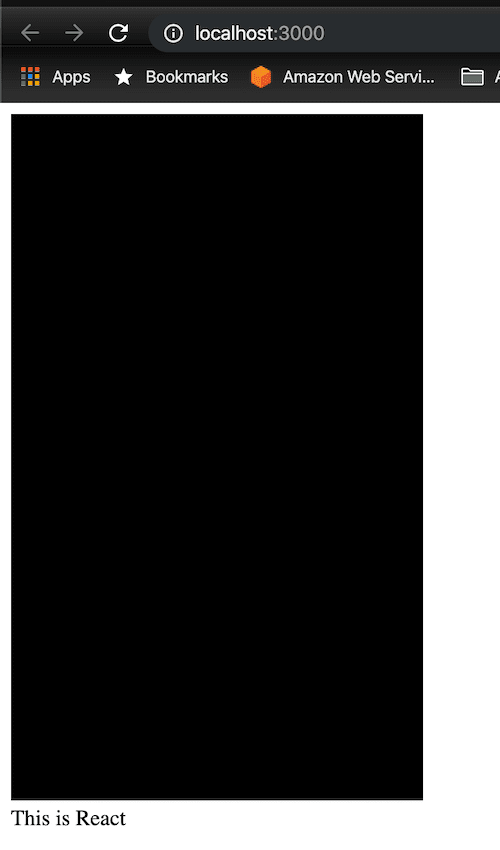
Change render function of App.tsx file:
  render() {
    return <>
      <div id="game-root"></div>
      This is React
    </>
  }
Add a new folder /src/game and create file MainScene.ts. Note that this is a "ts" file not "tsx".
import Phaser from 'phaser'

class MainScene extends Phaser.Scene {
  constructor() {
    super('MainScene')
  }
}

export default MainScene
Now change the content of App.tsx file as below:
import React from 'react'
import Phaser from 'phaser'
import MainScene from '../game/MainScene'

type AppProps = {}
type AppState = {}

class App extends React.Component<AppProps, AppState> {
  constructor(props: AppProps) {
    super(props)
    const game = new Phaser.Game({
      parent: 'game-root',
      type: Phaser.AUTO,
      width: 300,
      height: 500,
      scene: [MainScene]
    })
  }

  render() {
    return <>
      <div id="game-root"></div>
      This is React
    </>
  }
}

export default App
We create a new Phaser.Game instance with MainScene. The game is mounted inside the div with id="game-root".
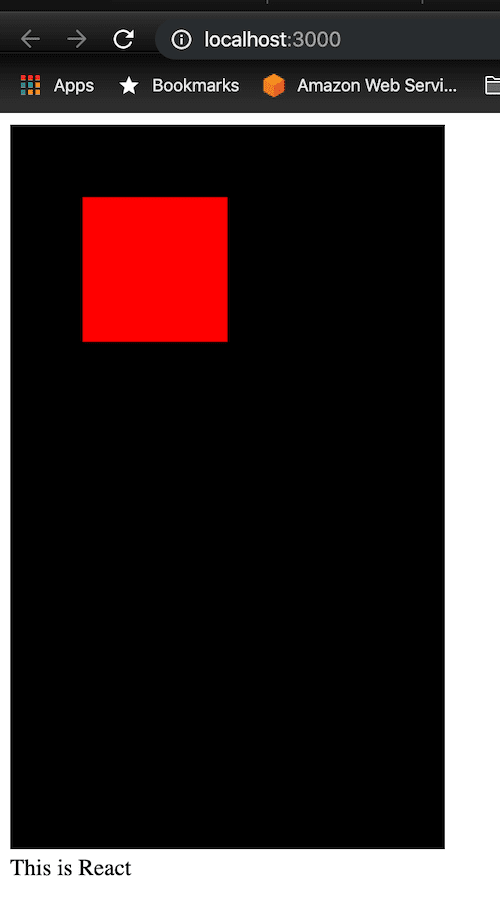
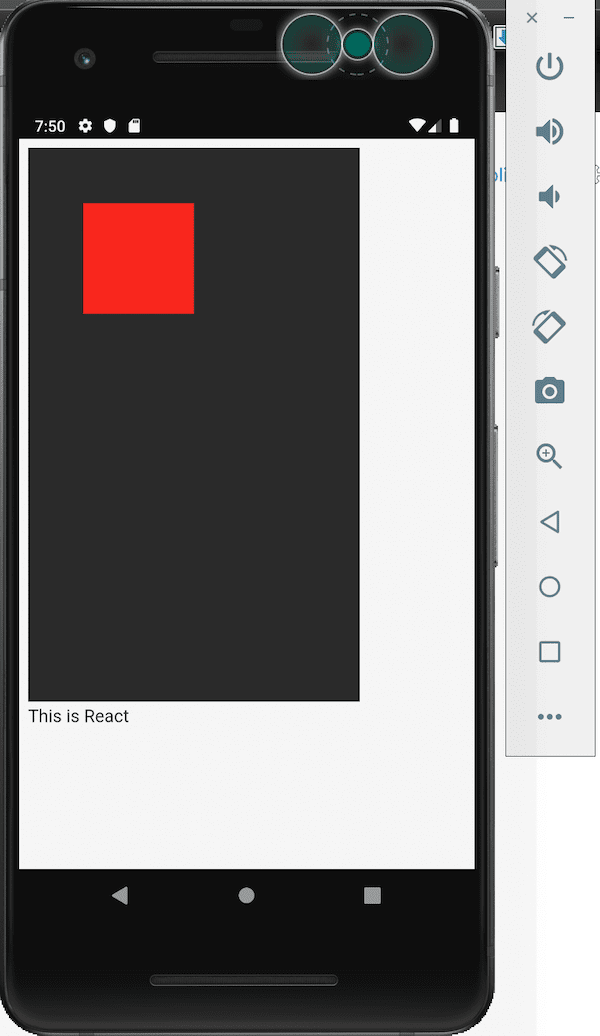
Now let's add some geometric shapes inside this blank app. Just add a new function inside MainScene.ts file
create(){
    this.add.rectangle(100,100, 100, 100, 0xff0000)
  }
Now let's add the final step. Add Ionic Capacitor library so we can turn it into Android (or iOS) app.
https://capacitor.ionicframework.com/docs/getting-started/
yarn add -D @capacitor/cli @capacitor/core
Below command will create config file for capacitor. All it needs is a /www folder that has the bundle. Run npm run build before if you haven't done already.
npx cap init
Notice that it creates a file called "capacitor.config.json" inside root folder.
Let's create Android project from this web project
npx cap add android
And open Android Studio:
npx cap open android
Let the gradle build for sometime and run it using emulator or physical device:
You can do the same with iOS or Electron.
Of course we have a very quick and dirty setup and our app does not look like a game. It does not even look like an app. But this is your boilerplate. Change it, add spritesheets and make it look like a game. And let the Capacitor, Webpack, React and TypeScript do the dirty job for you.